Monday 21 January 2013

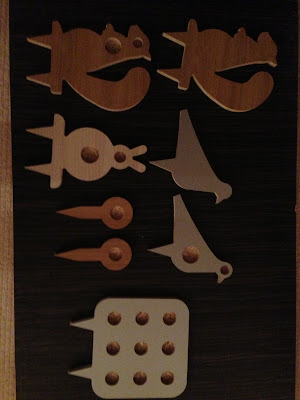
Full size silhouette targets for sale! 

SEARCH EBAY FOR _ FULL SIZE SILHOUETTE TARGETS


They are made from wood and are "semi disposable" i.e. you will get around 20 or more shots on each target before your pellets are punching straight through easily. 

So far I am making; Rabbits, Squirrels and Pigeons

They are great if you want to set out a full practice course but don't want to spend lots of money on buying 40 steel knockdown silhouette targets. 

I have been making them with and without kill zones machined into the face of them. 

At the moment I am trialling selling them on eBay to see how well they sell, then I may look at a dedicated website for selling them. 

Currently they are only available to UK buyers but if someone wanted to buy in bulk (at discounted rates), or was ok with the postage rates then I will also sell abroad. 

Currently the pricing is as follows:


£3 FOR 1 TARGETS + £3.50 P&P  


£7 FOR 3 TARGETS - THATS £2.33 PER TARGET + 6.50 P&P 


£13 FOR 6 TARGETS + £6.50 P&P 


£1.60 EACH IF YOU BUY 10 OR MORE! + £8.50 P&P 


£1.25 EACH IF YOU BUY 20 OR MORE! + £8.50 P&P -


BETTER PRICES AVAILABLE FOR HIGH QUANTITY ORDERS:


Thursday 14 June 2012

Finally bought a silencer for the Logun

It has been on the cards for a long time now but I could just never actually get around to buying a silencer for the Logun Solo. I was already shooting well with it, I liked the short proportions of it and the freezer was generally always fully stocked anyway with rabbits.

BUT!!!... last night I spoke to the game-keeper of the land around me and he said that I could shoot on it! I had been desperate to get some shooting on the land because the rabbits always tend to sit just on the field boundaries where I previously couldn't shoot but could see perfectly from my own land.

Anyway, on to the point of this post.... The game keeper told me that he would knock on the door tonight and I could join him for some shooting. I wanted to use the Logun seeing as it has the 10 shot magazine on it, however, it wasn't silenced. usually this is no bother to me because I will go out of the back door, walk around our grounds and take shots as they present themselves and then go back in the house for 20 minutes while the rabbits calmed down and started grazing again. This wouldn't work if i was out static hunting with the game-keeper so on my lunch break at work today I popped over to J F Neville's gun shop and bought my self a .22 Parker Hale (rimfire rated) silencer. for the princely sum of £27.50.

I had read  a few reviews on this silencer in the past but mainly from the rimfire boys, but all was very positive so I decided to go ahead with it. The silencer is all steel construction, including the baffles and as a result is a little weighty but it is extremely effective on my little Logun.

The proof is in the pudding as they say, and tonight I bagged 6 rabbits, 2 of which were literally seconds apart, with the second one not even knowing I had just shot his buddy.

Having seen the difference first hand I wouldn't even bother hunting with a PCP without a silencer now.

Thursday 7 June 2012

A bit of hunting...

Just lately the freezer has been running low on rabbits, so i decided it was about time i got myself out and filled it back up again. I have been out a few times lately and have a handful of "stories" to tell but i will do them one at a time rather than all at once. 

The first of the bunch was a 3/4 grown rabbit I took with the Logun Solo (12ft.lb) at about 35 yards. 

I stepped outside for a wander around the grounds with the Logun fully charged with air and 10 pellets in the mag. Around my place 10 shots is wayyy more than I need in 1 outing as i generally just have a short wander around and take opportunities that crop up and then go back into the house and let the quarry settle down and come back out again. Due to not having a silencer on the Logun (soon to be rectified) one shot will usually clear most of the quarry for a good 10-20 minutes. 

So, back to the story... I stepped out of the house and headed down the drive to see if there were any rabbits out in the field or on the drive itself. Just as I got down the drive, past the holly bush I saw a white tail running bouncing along, moving towards the hedge, stopping just at the entrance to its escape. My first instinct was to want to quickly draw the rifle up to my shoulder and rush the shot before it made it to safety through the hedge. Luckily sense prevailed and I SLOWLY raised the rifle to my shoulder as I dropped to one knee, with the rifle rested on my shooting sticks. I was 99% certain that the rabbit was in the bag before I even took the shot thanks to the shooting sticks giving me such a solid rest. 

As predicted the rabbit went down thanks to a shot just behind the eye and didn't even give a twitch or a kick. I paced out the distance to the rabbit as usual (always like to check my rangefinding assumptions) and carried it up towards the incinerator. 

I thumbed the rabbit down and set to work skinning, gutting and preparing the rabbit for the freezer. Most of my kills are used as food for the dog with the odd one being eaten by me or friends and family.


Saturday 2 June 2012

My Logun Solo will soon have a custom painted stock!

I have decided that enough is enough, I don't like the colour of the stock on my Logun Solo and luckily for me I have a contact that is amazing with a spray gun. So this leads to one logical soloution... Get the stock painted!!

I am currently waiting for some samples to come through with a few options for me. I have asked for a dark colour, probably matte effect and if possible with a texture. If anyone has seen "Ted's holdover" on YouTube AKA "EdgunUSA" then you will know how nice his stock looks. Well, his is a painted wooden stock and I love that kind of look. Apparently there will be a couple of samples coming to me, they are currently applying a heavier texture to one... I'm guessing this is the one I will choose and haven't even seen the samples yet!!


Here is a picture of the gun how it currently is:


Watch this space to find out how the gun turns out, I am very excited about how this could turn out!

Sunday 20 May 2012

New scope on the Ripley AR5s

Some of you will think I am daft for doing this but today I have swapped the £800 Swarovski Habicht 8x50 scope off the Ripley and changed it to now be wearing a £50 Richter Optik 3-9x50AOE scope!

The new scope (not my picture)


The reasoning behind this madness is there though - I wanted a mil-dot scope on the rifle.

The Swarovski had a much clearer picture even without parallax adjustability and it never seemed to need it either to be honest. But, having said all of that, the new scope does the trick nicely. I zeroed it in earlier at 50 yards and I only need to aim half a dot below for 30 yards which is perfect for me as quite a few of my shots are at less than 50 yards.

The Richter Optik scope has an adjustable objective lens for parallax, an illuminated reticule and a 3-9 variable zoom which is all I personally need. 

Next on the cards is a new scope cam mount seeing as the one I am using will only fit on my Logun Solo and was home made by me out of Polymorph. It just isn't cutting the mustard when it comes to shooting with it on and I can't do any hunting with it until I can shoot accurately with it on.

Before anyone asks... The Swarovski hasn't gone to waste, it is now sitting on the .22lr

Happy hunting everyone!

Friday 18 May 2012

How to make homemade airgun spinner targets!

As promised, here is the tutorial for making your own spinner targets like the ones in the picture below.


I will do a tutorial for how to make the 20mm spinner target but the size can all be adapted to make them bigger or smaller.


Materials list:


  • 3 or 4mm steel plate minimum of 20mm x 50 mm - ideally a bit bigger to allow you some room to work
  • 1 x Coach bolt 80mm long by 6mm (see picture below for a better guide as to what you need)
  • 2 x washers big enough to fit over the coach bolt.
  • 20-30mm of aluminium or steel tube that will fit over the coach bolt and still be able to spin freely
  • Paint


Tools list:

  • Drill and 7 or 8mm drill bit
  • Bench vice or clamp of some form
  • Hand files - half round and flat
  • Hacksaw
  • Adjustable spanner
  • Marker pen

1. Use your marker pen to mark out the shape of the target onto the steel - I drew around an object that was 20mm diameter and then drew a "tab" at the top. The "tab" will be the part you drill through that the target will spin on. 


Something like this shape will do nicely

2. Place the steel plate in your vice and cut out as close as you can to the lines with the hacksaw, just don't cut past your marked out lines. It is easiest to cut lots of straight lines that cut as close as possible to the marker lines, leaving any rounded corners for the file later on. (see picture below for clarification)


The cut pattern for the hacksaw


3. Swap the hacksaw for the half round file and file away the metal at points 1 and 2 in the picture below to make the concave shape around the tab


4.  Now use the flat file to file the convex edges of the target until you have reached the marked out line all the way around. 

5. Drill a 7 or 8mm hole in the top of the tab like the picture below.


6. Turn the target upside down and tighten the tab in the vice. only put it in the vice as far as the hole in the top.

Tighten it in the vice as far as the line in this picture
7. Take the adjustable spanner and open the jaws just enough to be able to slide it over the rounded part of the target. Now turn the handle of the spanner 90 degrees to put the twist into the tab.

Imagine the thick black line to be the spanner. This is the positioning you should be aiming for

8. You have now made the target part of the spinner. Just slide the components onto the coach bolt in the order shown in the picture below and you are ready to screw it into any fencepost, tree or just a piece of wood you can knock into the ground.

Have fun testing your DIY skills out and have fun shooting the targets. Please email me pictures through my profile if you make any your self I would love to see them.

Thursday 17 May 2012

New camera!!! :-D

Some great news for any followers or soon to be followers! I now have a new camera which has a 40x zoom on it. This means that I can now set it up next to me and zoom to the target whilst still having the scope cam on the rifle.... well... that is, if I can get the parallax issues sorted out with the camera/scope interface.

I will try and get a new video out over the weekend or maybe next week and I will try and include something different and maybe include some hunting on the scope cam. However, I wont be doing any scope cam hunting until i am 100% sure about the accuracy while using the scope cam.

See you all in the next vid!